Dominic Cronin's weblog
Using the Tridion PowerShell module in a restricted environment
At some point, pretty much every Tridion specialist is going to want to make use of Peter Kjaer's Tridion Core Service Powershell modules. The modules come with batteries included, and if you look at the latest version, you'll see that the modules are available from the PowerShell gallery, and therefore a simple install via Install-Module should "just work".
Most of us spend a lot of our time on computers that are behind a corporate firewall, and on which the operating system is managed for us by people whose main focus is on not allowing us to break anything. I recently found myself trying to install the modules on a system with an older version of PowerShell where Install-Module wasn't available. The solution for this is usually to install the PowerShellGet module which makes Install-Module available to you. In this particular environment, I knew that various other difficulties existed, notably with the way the PowerShell module path is managed. Installing a module would first require a solution to the problem of installing modules. In the past, I'd made a custom version of the Tridion module as a workaround, but now I was trying to get back to a clean copy of the latest, greatest version. Hacking things by hand would defeat my purpose.
It turned out that I was able to clone the GIT repository, so I had the folder structure on disk. (Failing that I could have tried downloading a Zip file from GitHub.)
Normally, you install your modules in a location on the Module Path of your PowerShell, and the commonest of these locations is the WindowsPowerShell folder in your Documents folder. (There are other locations, and you can check these with "gc Env:\PSModulePath".) As I've mentioned, in this case, using the normal Module Path mechanism was problematic, so I looked a little further. It turned out the solution was much simpler than I had feared. You can simply load a module by specifying its location when you call ImportModule. I made sure that the tridion-powershell-modules folder I'd got from GIT was in a known location relative to the script file from which I wanted to invoke it, and then called Import-Module using the location of Tridion-CoreService.psd1
$scriptLocation = Split-Path ((Get-Variable MyInvocation -Scope 0).Value).MyCommand.Path
import-module $scriptLocation\..\tridion-powershell-modules\CoreService\Tridion-CoreService.psd1
Getting the script location from the built-in MyInvocation variable is ugly, but pretty much standard PowerShell. Anyway - this works, and I now have a strategy for setting up my scripts to use the latest version of the core service module. Obviously, if you want the Alchemy or Content Delivery module, a similar technique ought to work.
deployer-conf.xml barfs on the BOM
Today I was working on some scripts to provision, among other things, the SDL Web deployer service. It should have been straightforward enough, I thought. Just copy the relevant directory and fix up a couple of configuration files. Well I got that far, at least, but my deployer service wouldn't start. When I looked in the logs and found this:
2017-09-16 19:20:21,907 ERROR NonLegacyConfigConditional - The operation could not be performed.
com.sdl.delivery.configuration.ConfigurationException: Could not load legacy configuration
 at com.sdl.delivery.deployer.configuration.DeployerConfigurationLoader.configure(DeployerConfigurationLoader.java:136)
 at com.sdl.delivery.deployer.configuration.folder.NonLegacyConfigConditional.matches(NonLegacyConfigConditional.java:25)
I thought it was going to be a right head-scratcher. Fortunately, a little further down there was something a little more clue-bestowing:
Caused by: org.xml.sax.SAXParseException: Content is not allowed in prolog.
 at org.apache.xerces.parsers.DOMParser.parse(Unknown Source)
 at org.apache.xerces.jaxp.DocumentBuilderImpl.parse(Unknown Source)
 at com.tridion.configuration.XMLConfigurationReader.readConfiguration(XMLConfigurationReader.java:124)
So it was about the XML. It seems that Xerxes thought I had content in my prolog. Great! At least, despite its protestations about a legacy configuration, there was a good clear message pointing to my "deployer-conf.xml". So I opened it up, thinking maybe my script had mangled something, but it all looked great. Then some subliminal, ancestral memory made me think of the Byte Order Mark. (OK, OK, it was Google, but honestly... the ancestors were there talking to me.)
I opened up the deployer-conf.xml again, this time in a byte editor, and there it was, as large as life:
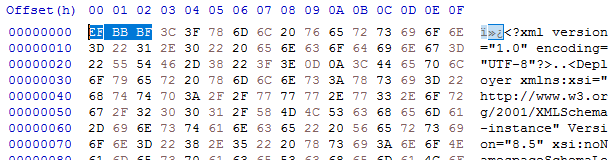
Three extra bytes that Xerxes thought had no business being there: the Byte Order Mark, or BOM. (I had to check that. I'm more used to a two-byte BOM, but for UTF-8 it's three. And yes - do follow this link for a more in-depth read, especially if you don't know what a BOM is for. All will be revealed.)
What you'll also find if you follow that link is that Xerxes is perfectly entitled to think that, as it's a "non-normative" part of the standard. Great eh?
Anyway - so how did the BOM get there, and what was the solution?
My provisioning scripts are written in Windows PowerShell, and I'd chosen to use PowerShell's "native" XML processing, which amounts to System.Xml.XmlDocument. In previous versions of these scripts, I'd used XLinq, but it's not really a good fit with PowerShell as you can't really use XPath without extension methods. So I gave up XLinq's ease of parsing fragments for a return to XmlDocument. To be honest, I wouldn't be surprised if the BOM problem also happens with XLinq: after all, it's Xerxes that's being fussy - you could argue Microsoft is playing "by the book".
So what I was doing was this.
$config = [xml](gc $deployerConfig)
Obviously, $deployerConfig refers to the configuration file, and I'm using Powershell's Get-Content cmdlet to read the file from disk. The [xml] cast automatically loads it into an XmlDocument, represented by the $config variable. I then do various manipulations in the XmlDocument, and eventually I want to write it back to disk. The obvious thing to do is just use the Save() method to write it back to the same location, like this:
$config.Save($deployerConfig)
Unfortunately, this gives us the unwanted BOM, so instead we have to explicitly control the encoding, like this:
$encoding = new-object System.Text.UTF8Encoding $false
$writer = new-object System.IO.StreamWriter($deployerConfig,$false,$encoding)
$config.Save($writer)
$writer.Close()
As you can see, we're still using Save(), but this time with the overload that writes to a stream, and also allows us to pass in an encoding. This seems to work fine, and Xerces doesn't cough it's lunch up when you try to start the deployer.
I think it will be increasingly common for people to script their setups. SDL's own "quickinstall" doesn't use an XML parser at all, but simply does string replacements based on its own, presumably hand-made, copies of the configuration files. Still - one of the obvious benefits of having XML configuration files is that you can use XML processing tools to manipulate them, so I hope future versions of the content delivery microservices will be more robust in this respect. Until then, here's the workaround. As usual - any feedback or alternative approaches are welcome.
Finding the powershell profiles you actually have
Many of you Powershell aficionados out there will be familiar with the fact that there are four separate locations where you can place a profile script. These scripts will run when you start the shell, and that allows you to get some default stuff set up. (How hard can it be? Well actually, much harder!)
Today I got irritated with the fact that I can never find which profile I've put something in. It starts with a vague recollection of "didn't I have something in my profile for that?". Then I start by opening a shell and typing:
notepad $profile
... and thereby opening up my $profile.CurrentUserCurrentHost - which to be fair is where I put most stuff. Not there eh? Ok, let's go looking for the other profiles. So I type:
notepad $profile.<TAB><TAB>
and end up at
notepad $profile.AllUsersAllHosts
Then notepad tells me that this one doesn't exist, so I end up going through the same steps for the other two profiles. Especially on a system where they aren't there, it's just irritating. So I put this in my profile (yes, the CurrentUserCurrentHost one, but actually AllHosts would be better, eh?):
function get-profiles {
    $profile.PSobject.Properties | ? {Test-Path $_.Value} | select Name, Value
}
Now all I have to do is remember that I put it there.
Decoding webdav URLs (or how to avoid going cross-eyed reading your error messages)
I was doing some Content Porting the other day. When moving code up the DTAP street the general practice is to switch off dependency management and, well, manage the dependencies yourself. This is great for a surgical software release, where you know exactly what's in the package and can be sure that you aren't unintentionally releasing something you hadn't planned to, but....
Yeah - there's always a but. In this case, you have to make sure that all the items your exported items depend on are present, either in the export or in the target system. Sometimes you miss one, and during the import you get a nice error message saying which item is missing. Unfortunately, the location of the item is given as a WebDAV URL. If the item in question has lots of spaces, quote marks, or other special characters in it, by the time you get to read the URL in all its escaped glory, it can be a complete alphabet soup.
So there I was, squinting at some horrible URL and mentally parsing out the escape sequences to figure out what I was looking at.. when it dawned on me. Decoding encoded URLs is not work for humans - we have computers for that. So I fired up my trusty Powershell, thinking "hey, I have the awesome power of the .NET framework at my disposal". As it turns out, the HttpUtility libraries that most devs are familiar with is probably not there in your ordinary desktop OS, but System.Net.WebUtility is. So if you've copied a webdav url into your paste buffer, you can open the shell, type in
[net.webutility]::Ur
From here on tab completion will fill in the rest of UrlDecode, and with one or two more keystrokes and a right-mouse-click you have something like this:
[net.webutility]::UrlDecode("/webdav/Some%20Publication/This%20%26%20that/More%20%22stuff%22%20to%20read/a%20soup%C3%A7on%20of%20something")
and then hitting enter gets you this:
/webdav/Some Publication/This & that/More "stuff" to read/a soupçon of something
which is much more readable.
Of course, if even that is too much typing for you, you can stick something like this in your profile:
function decode ($subject) {
   [net.webutility]::UrlDecode($subject)
}
Of course, none of this is strictly necessary - you can always stare at the WebDAV URLs and decipher them as an exercise in mental agility, but some days you just want the easy life.
Revisiting validateXml
Some time back in 2009 I blogged about validating Tridion's content delivery configuration files. It was a good idea then, and it's remained a good idea ever since. These days, we're dealing with SDL Web 8 and with the new micro-services architecture, you've got a lot of configuration files to get right. (On my fairly unambitious test system, running staging and live together, I just counted almost 80 configuration files.) Fortunately these seem to be reliably supported with schema files that are simply in each of the microservice folders that you copy during an installation.
Back when I first wrote the ValidateXmlFile powershell function, I'd left it rather unfinished. It was good enough to let me do some validations and detect problems, but it had a significant flaw, in that if a schema file was not present at the location indicated by the noNamespaceSchemaLocation attribute, it would simply not bother with validation. Considering that we're using an XmlReader to do the validation, this is a pretty reasonable design decision - after all the main purpose is to read in the XML, and validation is perhaps a bit of a side-effect. Fair enough, but it's a nasty hole in our defences, so now that I'm revisiting the technique, I've beefed up the script a bit so that it checks that the location is present and that there's a file in the location.
I've also made sure that the script does some pushd/popd to make sure that everything is nicely lined up when the location is relative to the file (which it generally is).
Here's the updated script:
function ValidateXmlFile {
    param ([string]$xmlFile       = $(read-host "Please specify the path to the Xml file"))
	$xmlFile = resolve-path $xmlFile
    "==============================================================="
    "Validating $xmlFile using the schemas locations specified in it"
    "==============================================================="
    # The validating reader silently fails to catch any problems if the schema locations aren't set up properly
    # So attempt to get to the right place....
    pushd (Split-Path $xmlFile)

    try {
        $ns = @{xsi='http://www.w3.org/2001/XMLSchema-instance'}
	# of course, if it's not well formed, it will barf here. Then we've also found a problem
        # use * in the XPath because not all files begin with Configuration any more. We'll still
        # assume the location is on the root element
        $locationAttr = Select-Xml -Path $xmlFile -Namespace $ns -XPath */@xsi:noNamespaceSchemaLocation
        if ($locationAttr -eq $null) {throw "Can't find schema location attribute. This ain't gonna work"}

        $schemaLocation = resolve-path $locationAttr.Path
        if ($schemaLocation -eq $null)
        {
            throw "Can't find schema at location specified in Xml file. Bailing"
        }

        $settings = new-object System.Xml.XmlReaderSettings
        $settings.ValidationType = [System.Xml.ValidationType]::Schema
        $settings.ValidationFlags = $settings.ValidationFlags `
                -bor [System.Xml.Schema.XmlSchemaValidationFlags]::ProcessSchemaLocation
        $handler = [System.Xml.Schema.ValidationEventHandler] {
            $args = $_ # entering new block so copy $_
            switch ($args.Severity) {
                Error {
                    # Exception is an XmlSchemaException
                    Write-Host "ERROR: line $($args.Exception.LineNumber)" -nonewline
                    Write-Host " position $($args.Exception.LinePosition)"
                    Write-Host $args.Message
                    break
                }
                Warning {
                    # So far, everything that has caused the handler to fire, has caused an Error...
                    # So this /might/ be unreachable
                    Write-Host "Warning:: " + $args.Message
                    break
                }
            }
        }
        $settings.add_ValidationEventHandler($handler)
        $reader = [System.Xml.XmlReader]::Create($xmlfile, $settings)
        while($reader.Read()){}
        $reader.Close()

    }
    catch {
        throw
    }
    finally {
        popd
    }
}
Of course, what you really want is to be able to verify all your configurations in one go. Once the script is in your powershell $profile, you can put together some fairly simple command-line-fu to take care of that. I have all my microservices in one directory, which I guess is a pretty common pattern, so all I had to do was CD over there and execute the following:
gci -r -file -include *conf.xml | % {ValidateXmlFile $_}
By running this, I've also picked a couple of things that might be false positives. That aside, this is a real time saver if you're trying to solve issues. There's nothing like being able to eliminate a lot of the stupid typos from consideration all in one go.
Using the Powershell to parse columns out of strings
I've been kicking the tyres on Docker, and after a fairly short while I noticed that my list of containers was getting a little full. I decided to clean up, and after a quick look at the documentation, realised that I'd first have to run "docker ps -a" to get a list of all my containers, and then filter the list to get the ones I wanted to delete. (The alternative, was to read through the list, and manually execute "docker rm" on each one that I wanted to delete, and I'm far too lazy for that.)
Here's what the output from "docker ps -a" looks like
CONTAINER ID        IMAGE                  COMMAND                  CREATED             STATUS                         PORTS               NAMES
f7a3b9bb073c        dominiccronin/gentoo   "/bin/bash"              33 minutes ago      Exited (127) 33 minutes ago                        adoring_bell
2ec710c32df0        dominiccronin/gentoo   "/bin/bash"              16 hours ago        Exited (0) About an hour ago                       hungry_pare
7805ed925e51        gentoo/portage         "sh"                     16 hours ago        Created                                            portage
43c207846b56        dominiccronin/gentoo   "/bin/bash"              16 hours ago        Exited (127) 16 hours ago                          big_goodall
bbcc2e6d87d1        dominiccronin/gentoo   "/bin/bash"              18 hours ago        Exited (0) 18 hours ago                            infallible_mayer
f710c351291d        ubuntu:14.04           "C:/Program Files/Git"   8 months ago        Created                                            hopeful_archimedes
94acf6155aba        ubuntu:14.04           "C:/Program Files/Git"   8 months ago        Created                                            drunk_mahavira
e5bf3c39aa9e        ubuntu:14.04           "C:/Program Files/Git"   8 months ago        Created                                            desperate_pasteur
22ace2ca4ba1        ubuntu                 "C:/Program Files/Git"   8 months ago        Created                                            furious_brattain
a20746611b7b        67af10dd2984           "/bin/sh -c '/usr/gam"   9 months ago        Exited (0) 9 months ago                            berserk_goodall
398be811cb6a        67af10dd2984           "/bin/sh -c '/usr/gam"   9 months ago        Exited (0) 9 months ago                            fervent_torvalds
6363467ab659        67af10dd2984           "/bin/sh -c '/usr/gam"   9 months ago        Exited (0) 9 months ago                            grave_bardeen
b21bbf5103f0        67af10dd2984           "/bin/sh -c '/usr/gam"   9 months ago        Exited (0) 9 months ago                            ecstatic_feynman
56f1700ba2ca        67af10dd2984           "/bin/sh -c '/usr/gam"   9 months ago        Exited (0) 9 months ago                            elated_elion
0d41f9675f61        docker/whalesay        "cowsay boo-boo"         9 months ago        Exited (0) 9 months ago                            hopeful_brown
7309c5215e9f        docker/whalesay        "cowsay fooobar"         9 months ago        Exited (0) 9 months ago                            berserk_payne
23c1b894cec2        docker/whalesay        "whalesay fooobar"       9 months ago        Created                                            lonely_jones6
6a8c27a31740        docker/whalesay        "cowsay boo"             9 months ago        Exited (0) 9 months ago                            mad_jones
e5ca9dec78bc        docker/whalesay        "cowsay boo"             9 months ago        Exited (0) 9 months ago                            sleepy_ardinghelli
43c4d5c7a996        hello-world            "/hello"                 9 months ago        Exited (0) 9 months ago                            cocky_khorana
cbfe9e33af32        hello-world            "/hello"                 9 months ago        Exited (0) 9 months ago                            mad_leakey
The "hello, world" examples for Docker are all based on Docker's "theme animal", which is a whale, so if I could identify all the items where the image name contained the string "whale", I'd be on to a good thing. The only problem was that when you run a docker command like this in the powershell, all you get back is a list of strings. The structure of the columns is lost. A quick google showed that there is a Powershell module that might allow me to be even more lazy in the future but the thought of not being able to do it directly from the shell irritated me. So... here goes... this is how you do it:
docker ps -a | %{,@($_ -split ' {2,}')} | ?{$_[1] -match 'whale'} | %{docker rm $_[0]}
Yes, yes, I get it. That looks like the aftermath of an explosion in the top row department of a keyboard factory, so let's take it down a bit.
The interesting part is probably the second element in the pipeline. So after "docker ps -a" has thrown a list of strings into the pipeline, the second element is where I'm deconstructing the string into its constituent columns. The '%' operator is shorthand for 'foreach', so every line will be processed by the script block between the braces, and the line itself is represented by the built-in variable '$_'. (In the third, element you can see a similar construction but with a '?', so instead of a 'foreach', it's a 'where'.)
You can use a Regex with the split operator, and here I've used ' {2,}' to indicate that if there are 2 or more spaces together, I wish to use that as a column separator. Some of the columns are free text, with spaces in them, so I'm taking this pragmatic approach to avoid matching on a single space. Of course, there will be edge cases that break this, so I heartily recommend that you test the results first before actually doing 'docker rm'. Just replace the last element with something like "%{$_[1]}".
Having got the line split into columns, the next challenge is the PowerShell itself. If you throw anything that looks like a collection into the pipeline, it will get automatically unwrapped, and each item will be processed separately in the next block. So here, I'm wrapping the split in an array expression @(), and then preceding that with a comma. The comma operator is used to join a list of items into an array. Usually, this is something like 'a','b','c' - but it works just as well with a single operand, and so ,@(...) gets us an array containing an array. Then when it gets unwrapped by the pipeline, we have just the array containing the split fields. This means that in the third pipeline element we can filter on the value of $_[1] which is the IMAGE field. The fourth element actually invokes "docker rm" using the CONTAINER ID ($_[0]).
I've used Docker as the basis for this example. Just for the record, using the Docker Powershell module I mentioned, I managed to remove all my Ubuntu containers like this:
Get-Container | ?{$_.Image -match 'bun'} | Remove-Container
But as, I said, I'm just using Docker as an example. This PowerShell technique will also help you in many situations where there isn't a module available for the task at hand.
Checking your DXA/DD4T JSON in the SDL Web broker database
Over at the Indivirtual blog, I've posted about a diagnostic technique for use with the SDL Web broker database.
https://blog.indivirtual.nl/checking-dxadd4t-json-sdl-web-broker-database/
Enjoy!
Testing the SDL Web 8 micro-services
Over at blog.indivirtual,nl I've just blogged about testing the SDL Web 8 microservices.
Finding your way around the SDL Web 8 cmdlets
In SDL Web 8, there are far more things managed via Windows PowerShell than there used to be in previous releases of the product. On the one hand, this makes a lot of sense, as the PowerShell offers a clean and standardised way to interact with various settings and configurations. Still, not everyone is familiar enough with the PowerShell to immediately get the most out of the cmdlets provided by the SDL modules. In fact, today, someone told me quite excitedly that they'd discovered the Get-TtmMapping cmdlet. My first question was "Have you run Get-Command on the SDL modules?"
The point is that with the PowerShell, quite a lot of attention is paid to discoverability. Naming conventions are specified so that you have a good chance of being able to effectively guess the name of the command you need, and other tools are provided to help you list what is available. The starting point is Get-Module. To list the modules available to you, you invoke it like this:
get-module -listavailable
This will list a lot of standard Windows modules, but on your SDL Web 8 Content Manager server, you should see the following at the bottom of the listing:
 Directory: C:\Program Files (x86)\SDL Web\bin\PowerShellModules

ModuleType Version Name ExportedCommands
---------- ------- ---- ----------------
Binary 0.0.0.0 Tridion.ContentManager.Automation {Clear-TcmPublicationTarget, Get-TcmApplicationIds, Get-Tc...
Binary 0.0.0.0 Tridion.TopologyManager.Automation {Add-TtmSiteTypeKey, Add-TtmCdEnvironment, Add-TtmCdTopolo...
This gives you the names of the available SDL modules. From here, you can dig in further to list the commands in each module, like this:
get-command -module Tridion.TopologyManager.Automation
This gives you the following output:
CommandType     Name                           ModuleName
-----------     ----                           ----------
Cmdlet          Add-TtmCdEnvironment           Tridion.TopologyManager.Automation
Cmdlet          Add-TtmCdTopology              Tridion.TopologyManager.Automation
Cmdlet          Add-TtmCdTopologyType          Tridion.TopologyManager.Automation
Cmdlet          Add-TtmCmEnvironment           Tridion.TopologyManager.Automation
Cmdlet          Add-TtmMapping                 Tridion.TopologyManager.Automation
Cmdlet          Add-TtmSiteTypeKey             Tridion.TopologyManager.Automation
Cmdlet          Add-TtmWebApplication          Tridion.TopologyManager.Automation
Cmdlet          Add-TtmWebsite                 Tridion.TopologyManager.Automation
Cmdlet          Clear-TtmCdEnvironment         Tridion.TopologyManager.Automation
Cmdlet          Clear-TtmMapping               Tridion.TopologyManager.Automation
Cmdlet          Disable-TtmCdEnvironment       Tridion.TopologyManager.Automation
Cmdlet          Enable-TtmCdEnvironment        Tridion.TopologyManager.Automation
Cmdlet          Export-TtmCdStructure          Tridion.TopologyManager.Automation
Cmdlet          Get-TtmCdEnvironment           Tridion.TopologyManager.Automation
Cmdlet          Get-TtmCdTopology              Tridion.TopologyManager.Automation
Cmdlet          Get-TtmCdTopologyType          Tridion.TopologyManager.Automation
Cmdlet          Get-TtmCmEnvironment           Tridion.TopologyManager.Automation
Cmdlet          Get-TtmMapping                 Tridion.TopologyManager.Automation
Cmdlet          Get-TtmWebApplication          Tridion.TopologyManager.Automation
Cmdlet          Get-TtmWebsite                 Tridion.TopologyManager.Automation
Cmdlet          Import-TtmCdStructure          Tridion.TopologyManager.Automation
Cmdlet          Remove-TtmCdEnvironment        Tridion.TopologyManager.Automation
Cmdlet          Remove-TtmCdTopology           Tridion.TopologyManager.Automation
Cmdlet          Remove-TtmCdTopologyType       Tridion.TopologyManager.Automation
Cmdlet          Remove-TtmCmEnvironment        Tridion.TopologyManager.Automation
Cmdlet          Remove-TtmMapping              Tridion.TopologyManager.Automation
Cmdlet          Remove-TtmSiteTypeKey          Tridion.TopologyManager.Automation
Cmdlet          Remove-TtmWebApplication       Tridion.TopologyManager.Automation
Cmdlet          Remove-TtmWebsite              Tridion.TopologyManager.Automation
Cmdlet          Set-TtmCdEnvironment           Tridion.TopologyManager.Automation
Cmdlet          Set-TtmCdTopology              Tridion.TopologyManager.Automation
Cmdlet          Set-TtmCdTopologyType          Tridion.TopologyManager.Automation
Cmdlet          Set-TtmCmEnvironment           Tridion.TopologyManager.Automation
Cmdlet          Set-TtmMapping                 Tridion.TopologyManager.Automation
Cmdlet          Set-TtmWebApplication          Tridion.TopologyManager.Automation
Cmdlet          Set-TtmWebsite                 Tridion.TopologyManager.Automation
Cmdlet          Sync-TtmCdEnvironment          Tridion.TopologyManager.Automation
I'm sure you can see immediately that this gives you a great overview of the possibilities - probably including some things you hadn't thought of. You can also see how they follow the standard naming conventions. But now that you know what commands are available, how do you use them? What parameters do they accept? What are they for?
It might sound obvious, but indeed, the modules come with batteries included, including built-in help. So, for example, to learn more about a command, you can simply do this:
help Get-TtmMapping
or if your Unix roots are showing, this does the same thing:
man Get-TtmMapping
The output looks like this:
NAME
 Get-TtmMapping

SYNOPSIS
 Gets one or all Mappings from the Topology Manager.

SYNTAX
 Get-TtmMapping [[-Id] <String>] [-TtmServiceUrl <String>] [<CommonParameters>]

DESCRIPTION
 The Get-TtmMapping cmdlet retrieves a Mapping with the specified Id.
 If Id parameter is not specified, list of all Mappings will be returned.

RELATED LINKS
 Add-TtmMapping
 Set-TtmMapping
 Remove-TtmMapping

REMARKS
 To see the examples, type: "get-help Get-TtmMapping -examples".
 For more information, type: "get-help Get-TtmMapping -detailed".
 For technical information, type: "get-help Get-TtmMapping -full".
 For online help, type: "get-help Get-TtmMapping -online"
By using these few simple tools, you can accelerate your learning process and find the relevant commands easily and quickly. Happy hunting!
Powershell 5 for tired old eyes
With the release of Powershell 5, they introduced syntax highlighting. This is, in general, a nice improvement, but I wasn't totally happy with it, so I had to find out how to customise it. My problems were probably self-inflicted to some extent, as I think at some point I had tweaked the console colour settings. The Powershell is hosted in a standard Windows console, and the colours it uses are in fact the 16 colours available from the console.
The console colours start out by default as fairly basic RGB combinations. You can see these if you open up the console properties (right-click on the title bar of a console window will get you there). In the powershell, these are given names - the powershell has its own enum for these, which maps pretty directly on to the ConsoleColor enumeration of the .NET framework.
| ConsoleColor |
Description |
Red |
Green | Blue |
| Black |
The color black. |
0 |
0 |
0 |
| Blue |
The color blue. |
0 |
0 |
255 |
| Cyan |
The color cyan (blue-green). |
0 |
255 |
255 |
| DarkBlue |
The color dark blue. |
0 |
0 |
128 |
| DarkCyan |
The color dark cyan (dark blue-green). |
0 |
128 |
128 |
| DarkGray |
The color dark gray. |
128 |
128 |
128 |
| DarkGreen |
The color dark green. |
128 |
0 |
0 |
| DarkMagenta |
The color dark magenta (dark purplish-red). |
128 |
0 |
128 |
| DarkRed |
The color dark red. |
128 |
0 |
0 |
| DarkYellow |
The color dark yellow (ochre). |
128 |
128 |
0 |
| Gray |
The color gray. |
128 |
128 |
128 |
| Green |
The color green. |
0 |
0 |
255 |
| Magenta |
The color magenta (purplish-red). |
255 |
0 |
255 |
| Red |
The color red. |
255 |
0 |
0 |
| White |
The color white. |
255 |
255 |
255 |
| Yellow |
The color yellow. |
255 |
255 |
0 |
In the properties dialog of the console these are displayed as a row of squares like this:

and you can click on each colour and adjust the red-green-blue values. In addition to the "Properties" dialog, there is also an identical "Defaults" dialog, also available via a right-click on the title bar. Saving your tweaks in the Defaults dialog affects all future consoles, not only powershell consoles.
In the Powershell, you can specify these colours by name. For example, the fourth one from the left is called DarkCyan. This is where it gets really weird. Even if you have changed the console colour to something else, it's still called DarkCyan. In the following screenshot, I have changed the fourth console colour to have the values for Magenta.

Also of interest here is that the default syntax highlighting colour for a String, is DarkCyan, and of course, we also get Magenta in the syntax-highlighted Write-Host command.
Actually - this is where I first had trouble. The next screenshot shows the situation after setting the colours back to the original defaults. You can also see that I am trying to change directory, and that the name of the directory is a String.

My initial problem was that I had adjusted the Blue console color to have some green in it. This meant that a simple command such as CD left me with unreadable text with DarkCyan over a slightly green Blue background. This gave a particularly strange behaviour, because the tab-completion wraps the directory in quotes (making it a String token) when needed, and not otherwise. This means that as you tab through the directories, the directory name flips from DarkCyan to White and back again, depending on whether there's a space in it. Too weird...
But all is not lost - you also have control over the syntax highlighting colours. You can start with listing the current values using:
Get-PSReadlineOption
And then set the colours for the various token types using Set-PSReadlineOption. I now have the following line in my profile
Set-PSReadlineOption -TokenKind String -ForegroundColor White
(If you use the default profile for this, you will be fine, but if you use one of the AllHosts profiles, then you need to check that your current host is a ConsoleHost.)
Anyway - lessons learned... Be careful when tweaking the console colours - this was far less risky before syntax highlighting... and you can also fix the syntax highlighting colours if you need to, but you can only choose from the current console colours.